Friday, November 18, 2011

Day 119: New Window - Day 125: Running Water

Friday September 2, 2011

Much earlier in the project, we realized that the horrible replacement window installed by the previous owners had to go. Not only was is leaky, but the previous owners had installed a window designed for 2x6 framing, so it, and all of the other windows in our house, stick in and out of the walls by an inch. Also, the old "new" window was about 2 inches smaller on each side than the original. We knew exactly what we wanted, but we almost called the whole thing off after we were visted by the salesman representing the brand of window we wanted buy. After having to show the sales guy how to read a tape measure and many delays, our window finally arrived on Sept 2nd. The installer did a really good job on the outside, but his assistant was a little slow to figure out how help his boss properly align everything on the inside. Here are some during and after pictures.

They actually had to remove two old windows, since the existing window had been installed inside the original 1960s window frame. The result of this is a much nicer view of Garden Girl's garden


Thursday September 8, 2011


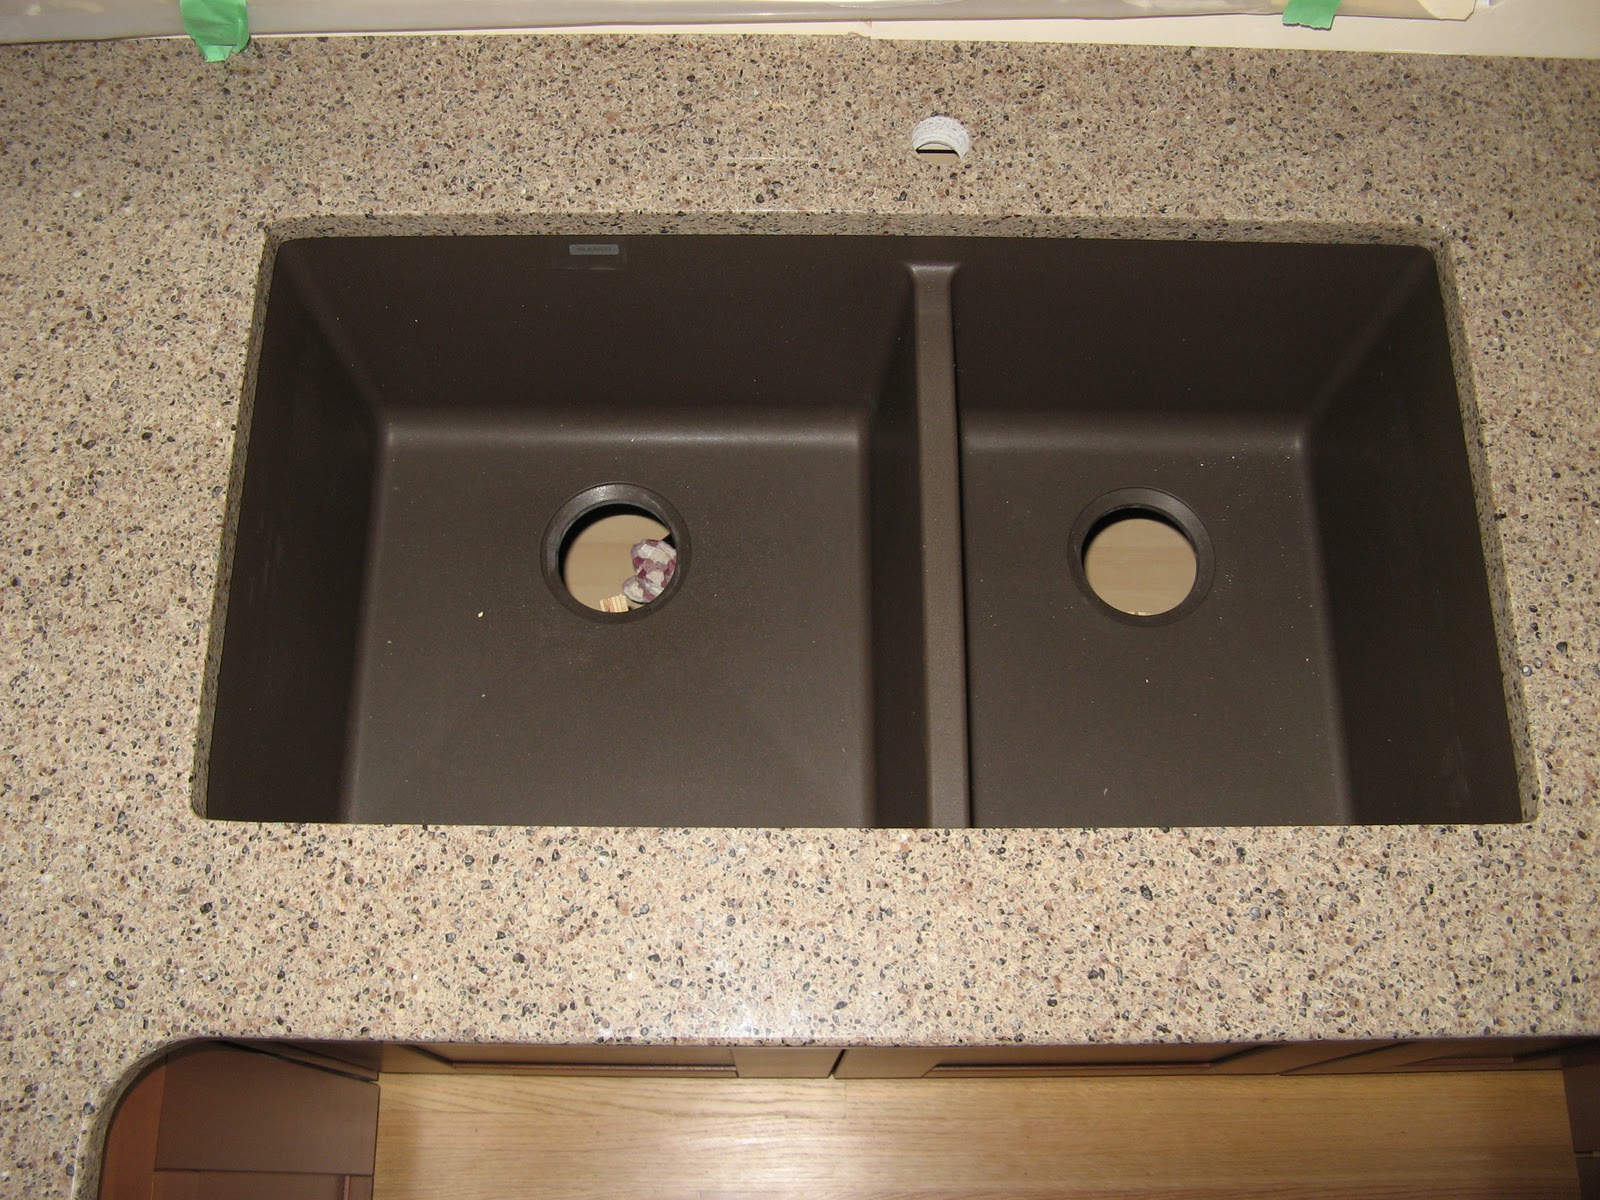
Today our friendly Neighbourhood Plumber connected our sink and dishwasher. The sink came out on day 3, so this will be 122 days without a kitchen sink. (The pile of gravel on the front lawn is part of an unrelated project to try to reduce flooding in our basement, but that's another story)


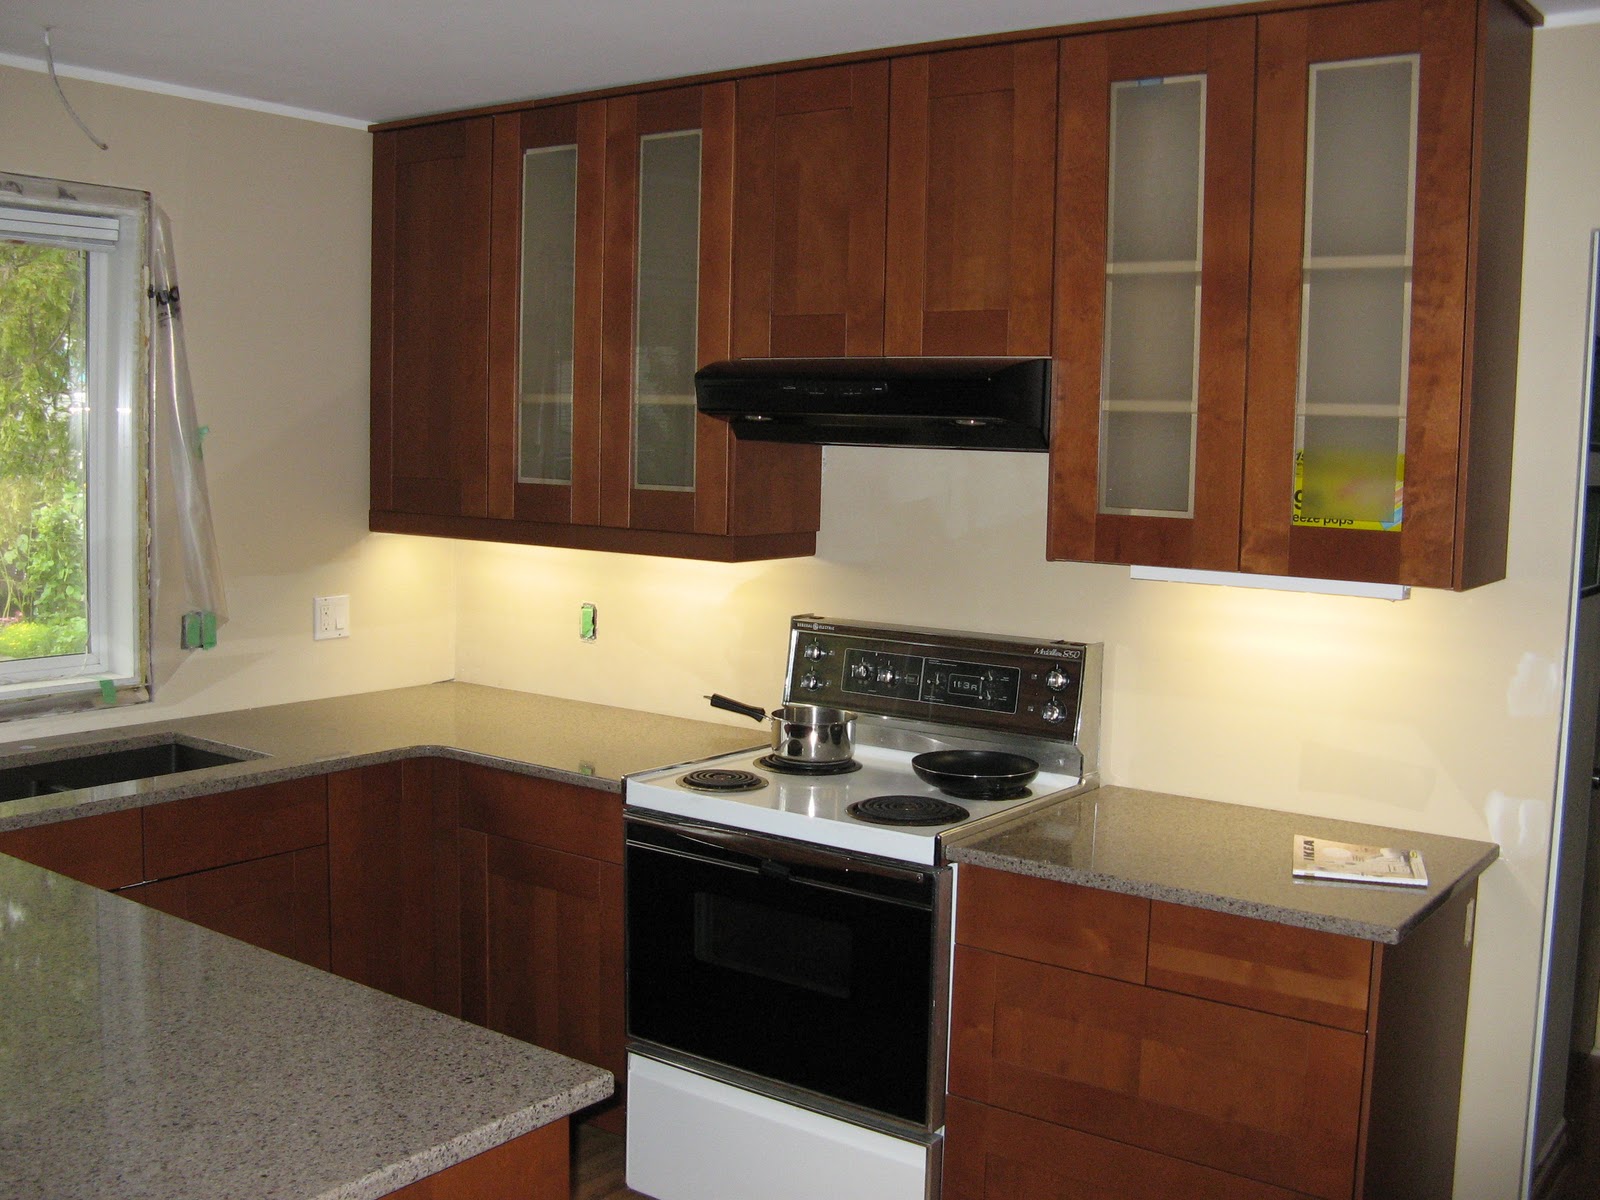
With the sink reconnected we started to move back in to the kitchen. Still to complete, some of the wood trim, some drywall in the living room, staining and installing the two pocket doors, and choosing and installing backsplash tiles, ceiling lights, and 41 cabinet door handles.

Day 105: Counters Measured - Day 116 Counters Installed

(Friday August 19 to Monday August 30, 2011)

Our trip to the Shuswap and the Okanagan was lots of fun, but I ended up coming home early to meet the counter measurer. I had two days by myself and in that time I was able to complete all of the upper trim, the light valences, install the last lower cabinet, the undercounter lighting and also install the other pocket door pocket in the living room. Unfortunately Garden Girl and the kids had both cameras, so no pictures of this step. The sink we had special ordered arrived on the 21st at Rona. I picked it up that afternoon and dropped it off at the counter fabricators the next morning on my way out of town for work for 10 days.

The counters were ready incredibly fast and I arranged to have them installed on Aug. 30, before Garden Girl and the kids got back from their trip. Sadly their vacation had been interrupted by the sudden passing of Garden Girl's grandpa and she had travelled from Vancouver back to Winnipeg for the funeral and then back to Vancouver before flying back to Calgary with the kids. I hoped they would be happily surprised by the counters, which they were.

The counter installers were a really interesting group. Three guys, two Albanians and one Afghan. The boss was a former Albanian land surveyor who said he was too old with too poor English to try to pass the professional exams here. I have never seen anyone so concerned about precision. He kept yelling at his Afghan assistant (who was formerly an accountant in Kabul) "half millimeter to south-east, no, no, no now zero point two mm to north-west" Anyway, I'm really happy with the counters and Garden Girl was really surprised when she got home. Here are the pictures. Counters installed, and the fridge, dishwasher, and microwave back where they belong and the computer once again installed in the kitchen/office corner.


For the microwave shelf, I borrowed an idea I found here which describes another adventure in Adel Medium Brown Ikea kitchen installation from 2008. Except I think I improved on her design by also making a custom shelf out of leftovers from the panel in front of the peninsula. Ironing off the birch coloured melamine from the microwave cabinet was easier than I expected, but ironing on three pieces of coloured trim that is supplied for finishing the edges of the toe-kicks was tricky.


The counter guys also installed the sink, but the plumbing had to wait for all the epoxy to dry.

Day 88 to Day 99 - Vacation and Confusion


Ok, we went on a three week family vacation to visit Garden Girls grandparents, aunts, and uncles in Kenora and Winnipeg and Handyman's brother and his family in Winnipeg. They live near confusion corner pictured here:


It was really, really nice to not have to do dishes in the basement bathroom for such a long time. Oma's tiny kitchen in Kenora has never looked so good. I even started to like the plastic amber glass windows in her cupboards.

While we were in Kenora, we tried to book our counter installers to have them come measure as soon as we got back. After numerous ignored emails, I phoned them and they had a new answering machine message saying they were in receivership. Thankfully they didn't take any of our money with them.

When we got back it was August and we were only in town for less than two weeks before summer road trip number to heading west. We managed to find a different company to do our counters and paid them, but they weren't available to measure yet. We also installed all of the doors and drawers and alot of the trim, but we were so busy we forgot to take any pictures!

Day 64: More Cabinets


(Saturday July 9, 2011)

Garden Girl's parents were visiting today half way through their annual drive from Vancouver to Winnipeg and Kenora. They helped assemble the last 5 cabinets. I rented a table saw and also had some fun customizing some of them, especially for the weird wedgeshaped corner. We did a surprising amount of work for what looks like a limited amount of progress. Garden Girl and her mom assembled all of the drawers and we cut all of the large trim pieces. We stopped with I started arguing with my mother-in-law about the best way to cut down the large panel for the back of peninsula and the other one for the side of fridge. Clearly we had both had way too much coffee. Here are some pictures of the progress at the end of the day. 


Some drawers installed:


With some major help from my inlaws, the peninsula is now in place, but not bolted down yet.


And my super snazy custom wedge shaped cabinet with the peninsula in the foreground.


I went a little crazy and even cut the shelf to the same angle


Next it's time for doors and drawers, plus a couple more cabinets. The only problem, it's July 9th and we're leaving on a 3 week trip east in one week! We were supposed to have had the counters measured for by then, but I guess that will have to wait until we get back on August 1st!.


Day 63: Finally Cabinets

(Friday July 8, 2011)

Ok, more than two months into the project and we are finally ready to install some cabinets. Garden Girl spent most of her free time this past week painting the entire room. For cabinets, they aways say to start with the wall cabinets first so you have room to work. This isn't quite as crucial with Ikea cabinets because the wall cabinets hang on a mounting rail that makes them really easy to hang and adjust. The base cabinets sit on levelable feet at the front and are supposed to rest on a strip of 5/8 MDF at the back 4.5 inches off the ground. Since we're planning quartz countertops, I've replaced this with 2x6 lumber ripped down to 4.5 inches and have added other reinforcement. There was about 1 cm of unlevelness in the floor, mostly in the first metre from the exterior wall, but otherwise the floor was fairly flat.

Here's the inside wall, which will eventually house the fridge, microwave and a computer. The pocket door pocket is almost finished, except for one side. Our house has a very 1962 style of drywall-only door frames and we're trying to match this with the the new work. Our fridge has been blocking the bedroom hallway for over two months with the kids room and bathroom on one side and our room on the other.


This is the wall between the kitchen and bathroom. The corner cabinets are showing off the first door and drawer front. The cabinet over the stove is missing because I haven't cut a hole in it or in the ceiling for the range hood exhaust. (I installed a vent when we had the roof replaced in 2005, thinking the kitchen was just a year away!) The plan is to keep the 1982 stove until it dies. Why? Because we like the analog oven controls.


The dishwasher is shown in its final location, but the penninsula it will be in, and its cabinets, haven't even been assembled yet. The sink cabinet under the window is next.


And here's that weird wedge shape again, with two wall cabinets above it and now nicely painted "mushroom cap" colour.


Finally, Garden Girl took a picture of her best outside drywall corner. Eventuall this wall will separate the fridge from the dining room.


Day 55 and 56: Paint Ceiling and Walls

(Thursday June 30, 2011)

Now that the drywall is more or less repaired, time to paint and install cabinets. Our kitchen ceiling is smooth finished drywall (the rest of the house is that spray on popcorn stuff) so we wanted it to look good. We couldn't agree on the location of the ceiling light fixtures (in fact we hadn't bought them yet either), so we ended up temporarily removing both of them and repairing the holes. We decided to try some new high-tech pink ceiling paint that was supposed to go in pink and dry white with a matte finish. 


It's more of a purplish colour, and it really does work. My only complaint is that the pinkishness goes away very quicky as it drys, so when you're painting it looks terrible since some of drys faster than other bits leaving a streaky pink/white pattern. I put on a second coat of paint before all of the pink had faded and I went to bed that night thinking I'd wasted my evening and money, but the next morning, the ceiling looked great.


Day 56: Paint Walls

(Friday July 1, 2011)

So here's the result (and Garden Girl painting the inside wall the colour of the rest of our main floor).

 The plan now is to start installing cabinets on this wall while continuing to paint the rest of the room.


Day 50 (But really it's Day 196!)

(Saturday June 25, 2011)

Ok, it's been 122 days since the last update, and the project isn't done yet. Garden Girl got too busy with the project, her garden, summer holidays, and now the school year, so updating the blog kind of stopped. So DH (in blog speak, but he prefers his superhero name Handyman) has been given permission to update the blog, or at least post some of the photos proving that some progress has been made.

So lets start with Day 50, a Saturday way back in June before the end of the last school year. The task, get the drywall repaired. We replaced 75% of the drywall in the kitchen, including the inside wall with the fridge and the exterior wall (after re-insulating and properly vapour barrier-ing all of outlets.

Here is the inside wall. The plywood is the back of the alcove for the fridge, the plan is to fake a counter depth fridge by making a 4 inch deep opening in the wall. We had to build a load-bearing door frame since that wall is holding up our ceiling. Apparently we have one of the last houses built before they started using roof trusses. 


Here is Fireboy helping sand the mud on the outside wall. He seems to have forgotten his CSA-approved shoes. Beside him you can see the horrible pink colour that was inside the original 1960s cabinets that we discovered when we took down the 1980s ones. 


And here is Garden Girl reparing the ceiling and more interesting old colours.


That weird shape at the bottom right is actually the head room for the stairs to the basement. In the first two kitchens it was hidden by a corner cabinet. We spent a lot of time trying to figure out what to do with this and eventually adopted the solution of one of our neighbours. More on that later...


While this is going on inside, outside we're building cabinets. The trouble with Ikea cabinets is not that they're hard to build, but doing it is boring. They're basically the same layout as a Billy bookcase or any other Ikea furniture and our kitchen has 21 of them in total. We hired the very keen 17 year old next door to help and got 16 of them done in one day. The kids each helped with a few, but I wasn't paying them so it was hard to keep their attention.